|
Displaying the completed puzzle.:
The account below is given using the experience gained on mounting an 18,000 piece puzzle for wall display. The data should be equally applicable for preparing this 24,000 piece puzzle for display.
Mounting a puzzle of such large dimensions is a very delicate task that needs to be made very carefully. The first thing to take in account is that we recommend gluing the whole puzzle within the same day, obviously divided in different
parts. If it is done on different days, it's very probable that the pieces
won't interlock well. This could be due to the wetness of the cardboard (due to the humidity that may vary from one day to another), or the pieces being joined with slightly different alignment to the earlier section. Gluing the puzzle at the same time would allow one to move or adjust any pieces as necessary (because the glue needs about 2 hours to dry ),
Choose the glue type carefully. You do not want one that dries too quickly. And you want one that will allow you to 'slide' /move the pieces a little. A spray one I tested was 'too dry' to allow this. When I put the puzzle down it stuck! But I needed to still adjust the pieces. I suggest that you test it on a small old puzzle first, so that you can check it is a suitable glue and to get a bit of practical experience. You don't want any last minute mistakes after getting this far!
If space allows, it is best to mount and frame the puzzle in the room where it will hang. It is easier to transport the puzzle and the wood or fluted-core plastic sheets in parts and assemble, than it is to move the whole framed puzzle.
These are the steps that a customer followed with her 18,000 piece puzzle - to a happy conclusion:
1. She assembled the puzzle in parts, until the whole puzzle was assembled on a thin wooden surface (or a clean floor would be fine). No glue was applied.
2. Once she had the puzzle fully assembled she subdivided it into four parts. And then each of those were broken down to into quarters (so in total, she had 4 x 4 = 16 parts). Still she didn't apply any glue to the puzzle.
3. On the ground parallel to the puzzle she had the final big wooden surface where the puzzle was going to be fixed. She calculated where to place each of the 16 puzzle sections (measuring and marking the board for accuracy). She applied the glue directly to the wooden surface of the first marked square. The glue that was used was carpenters glue. Note: it is very important that the glue isn't applied to the whole board at once. This makes access to parts of the puzzle board difficult). You apply the glue section by section, just going a little wider than your pencil marks to ensure that all the pieces are fully glued. Try to apply only the correct quantity for each part - to avoid having too much or too little, for obvious reasons.
Thus, first she applied the glue corresponding to the 1st of the 16 parts; after that and helped by someone else, she transported the first puzzle section to the prepared surface, very slowly and carefully, taking care that all the pieces were well placed without leaving any space among them. She repeated this process for each of the 16 parts. I'm not sure of the time she needed for this gluing process, but I know that the glue needs about two hours to be completely dry, so it allows you time to adjust the position of any pieces if necessary. As you can see, the puzzle was assembled by ONLY gluing on the back, no glue was used on the front of the puzzle. To assure that the pieces were well held down, the process was completed by pressing the puzzle surface with a roller.
4. They didn't cover it with a glass, but they only framed it with a specially made frame.
About the mounting board:
I've searched the web and have read various accounts of how people have framed earlier large jigsaw puzzles. Generally they have glued it onto sheets of plywood. Obviously one sheet of ply isn't big enough. They joined the pieces together with strips of wood on the back surface. Others also strengthened the sheet with wooden strips on the back to ensure that it didn't warp.
I have also spoken with a person who used fluted-core plastic sheets. These sheets are stiff and have the advantage of being lightweight. He joined several sheets together by using strong duct tape on the back. And then just nailed the combined sheets with the puzzle glued to the front onto his ceiling! It's been up there almost a year now with no problems.
Another on-line source said they taped together sheets of foam-core.
GOOD LUCK!
UPDATE: Our 'Hall of Fame' first completer has written an excellent description on how he mounted the finished puzzle. You can view it here (towards the end of the article.)
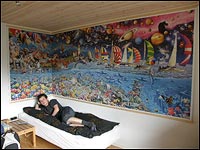
 Here is a great idea if you don't have a full 4.28m (14 foot) of wall space available ...
Bend the puzzle around a corner!
From: Simon - Solrød Strand, Denmark
Simon's Hall of Fame page can be seen HERE.
(Click image to enlarge)
|


